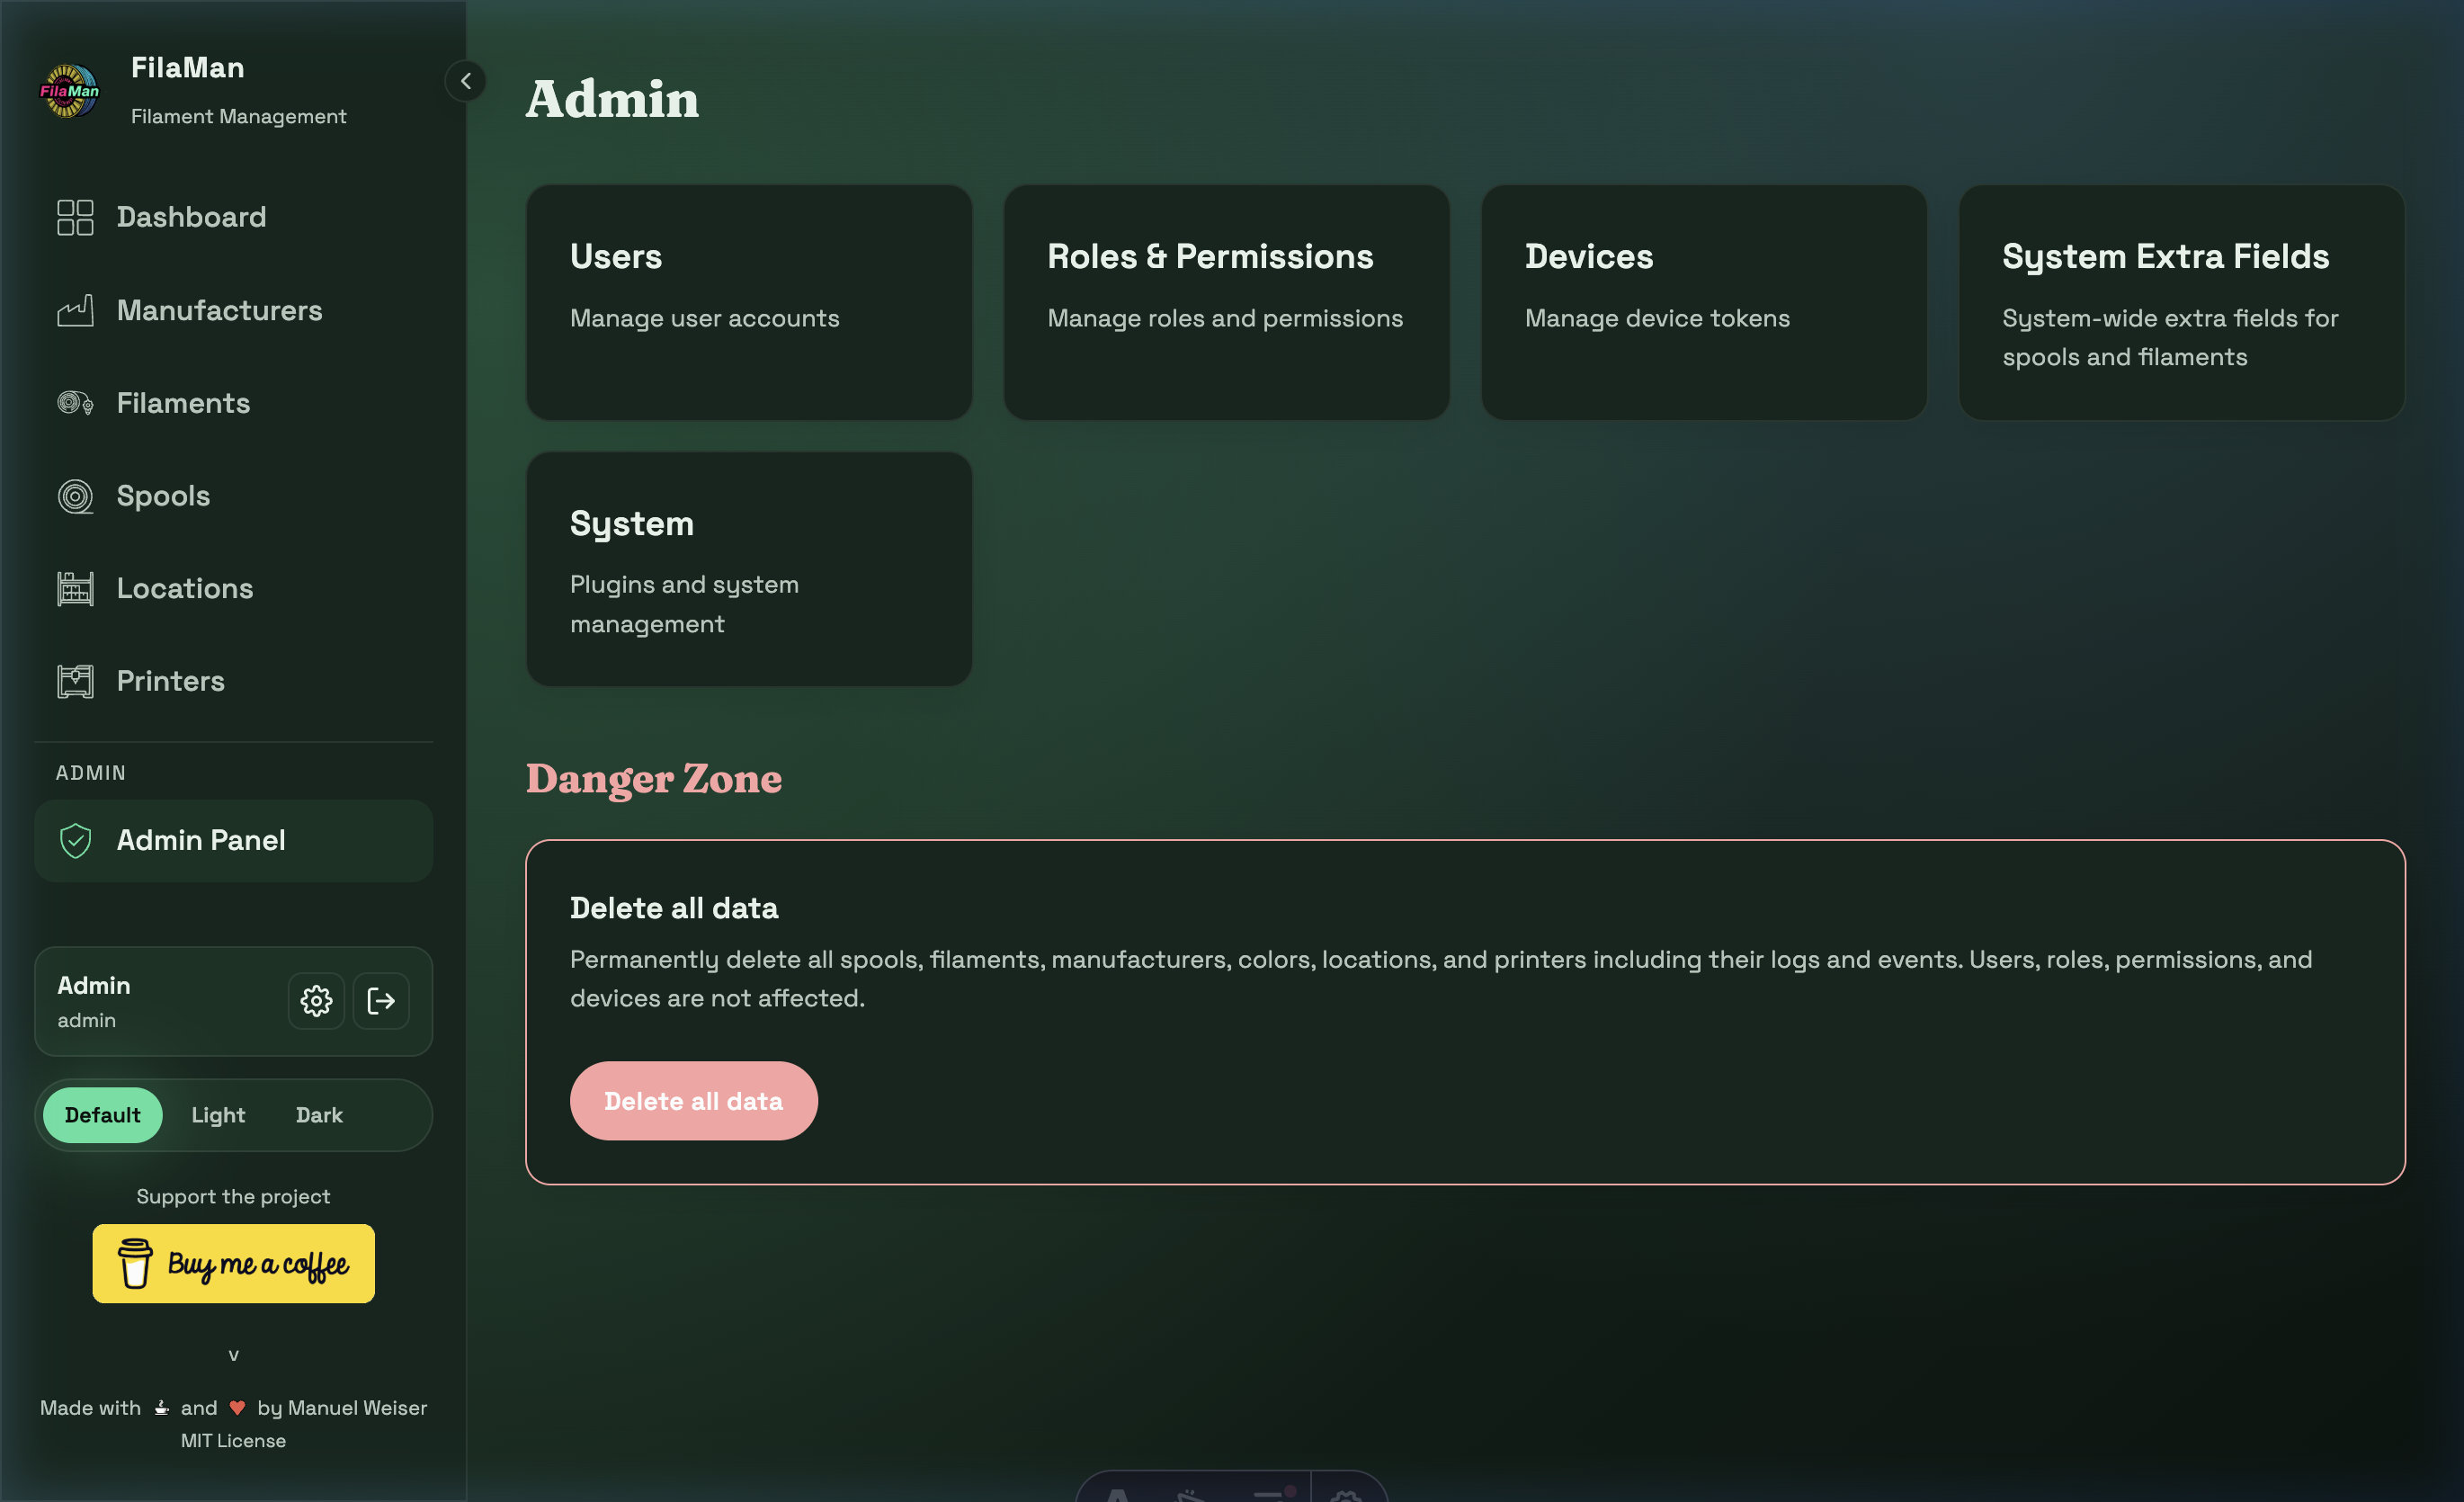
11. Admin Area
URL: http(s)://url/admin
⚠️ Note: The Admin area is only visible and accessible to users with the Administrator role.
The Admin Panel is the central hub for system administration. It provides access to the following sections:
| Card | Description |
|---|---|
| Users | User management |
| Roles & Permissions | Roles and permissions |
| Devices | Device token management |
| System Extra Fields | System-wide extra fields for spools and filaments |
| System | Plugins and system management |
| Database Backup | Export and restore database backups |
| OIDC / SSO | OpenID Connect Single Sign-On configuration |
11.1 User Management (Users)
URL: http(s)://url/admin/users
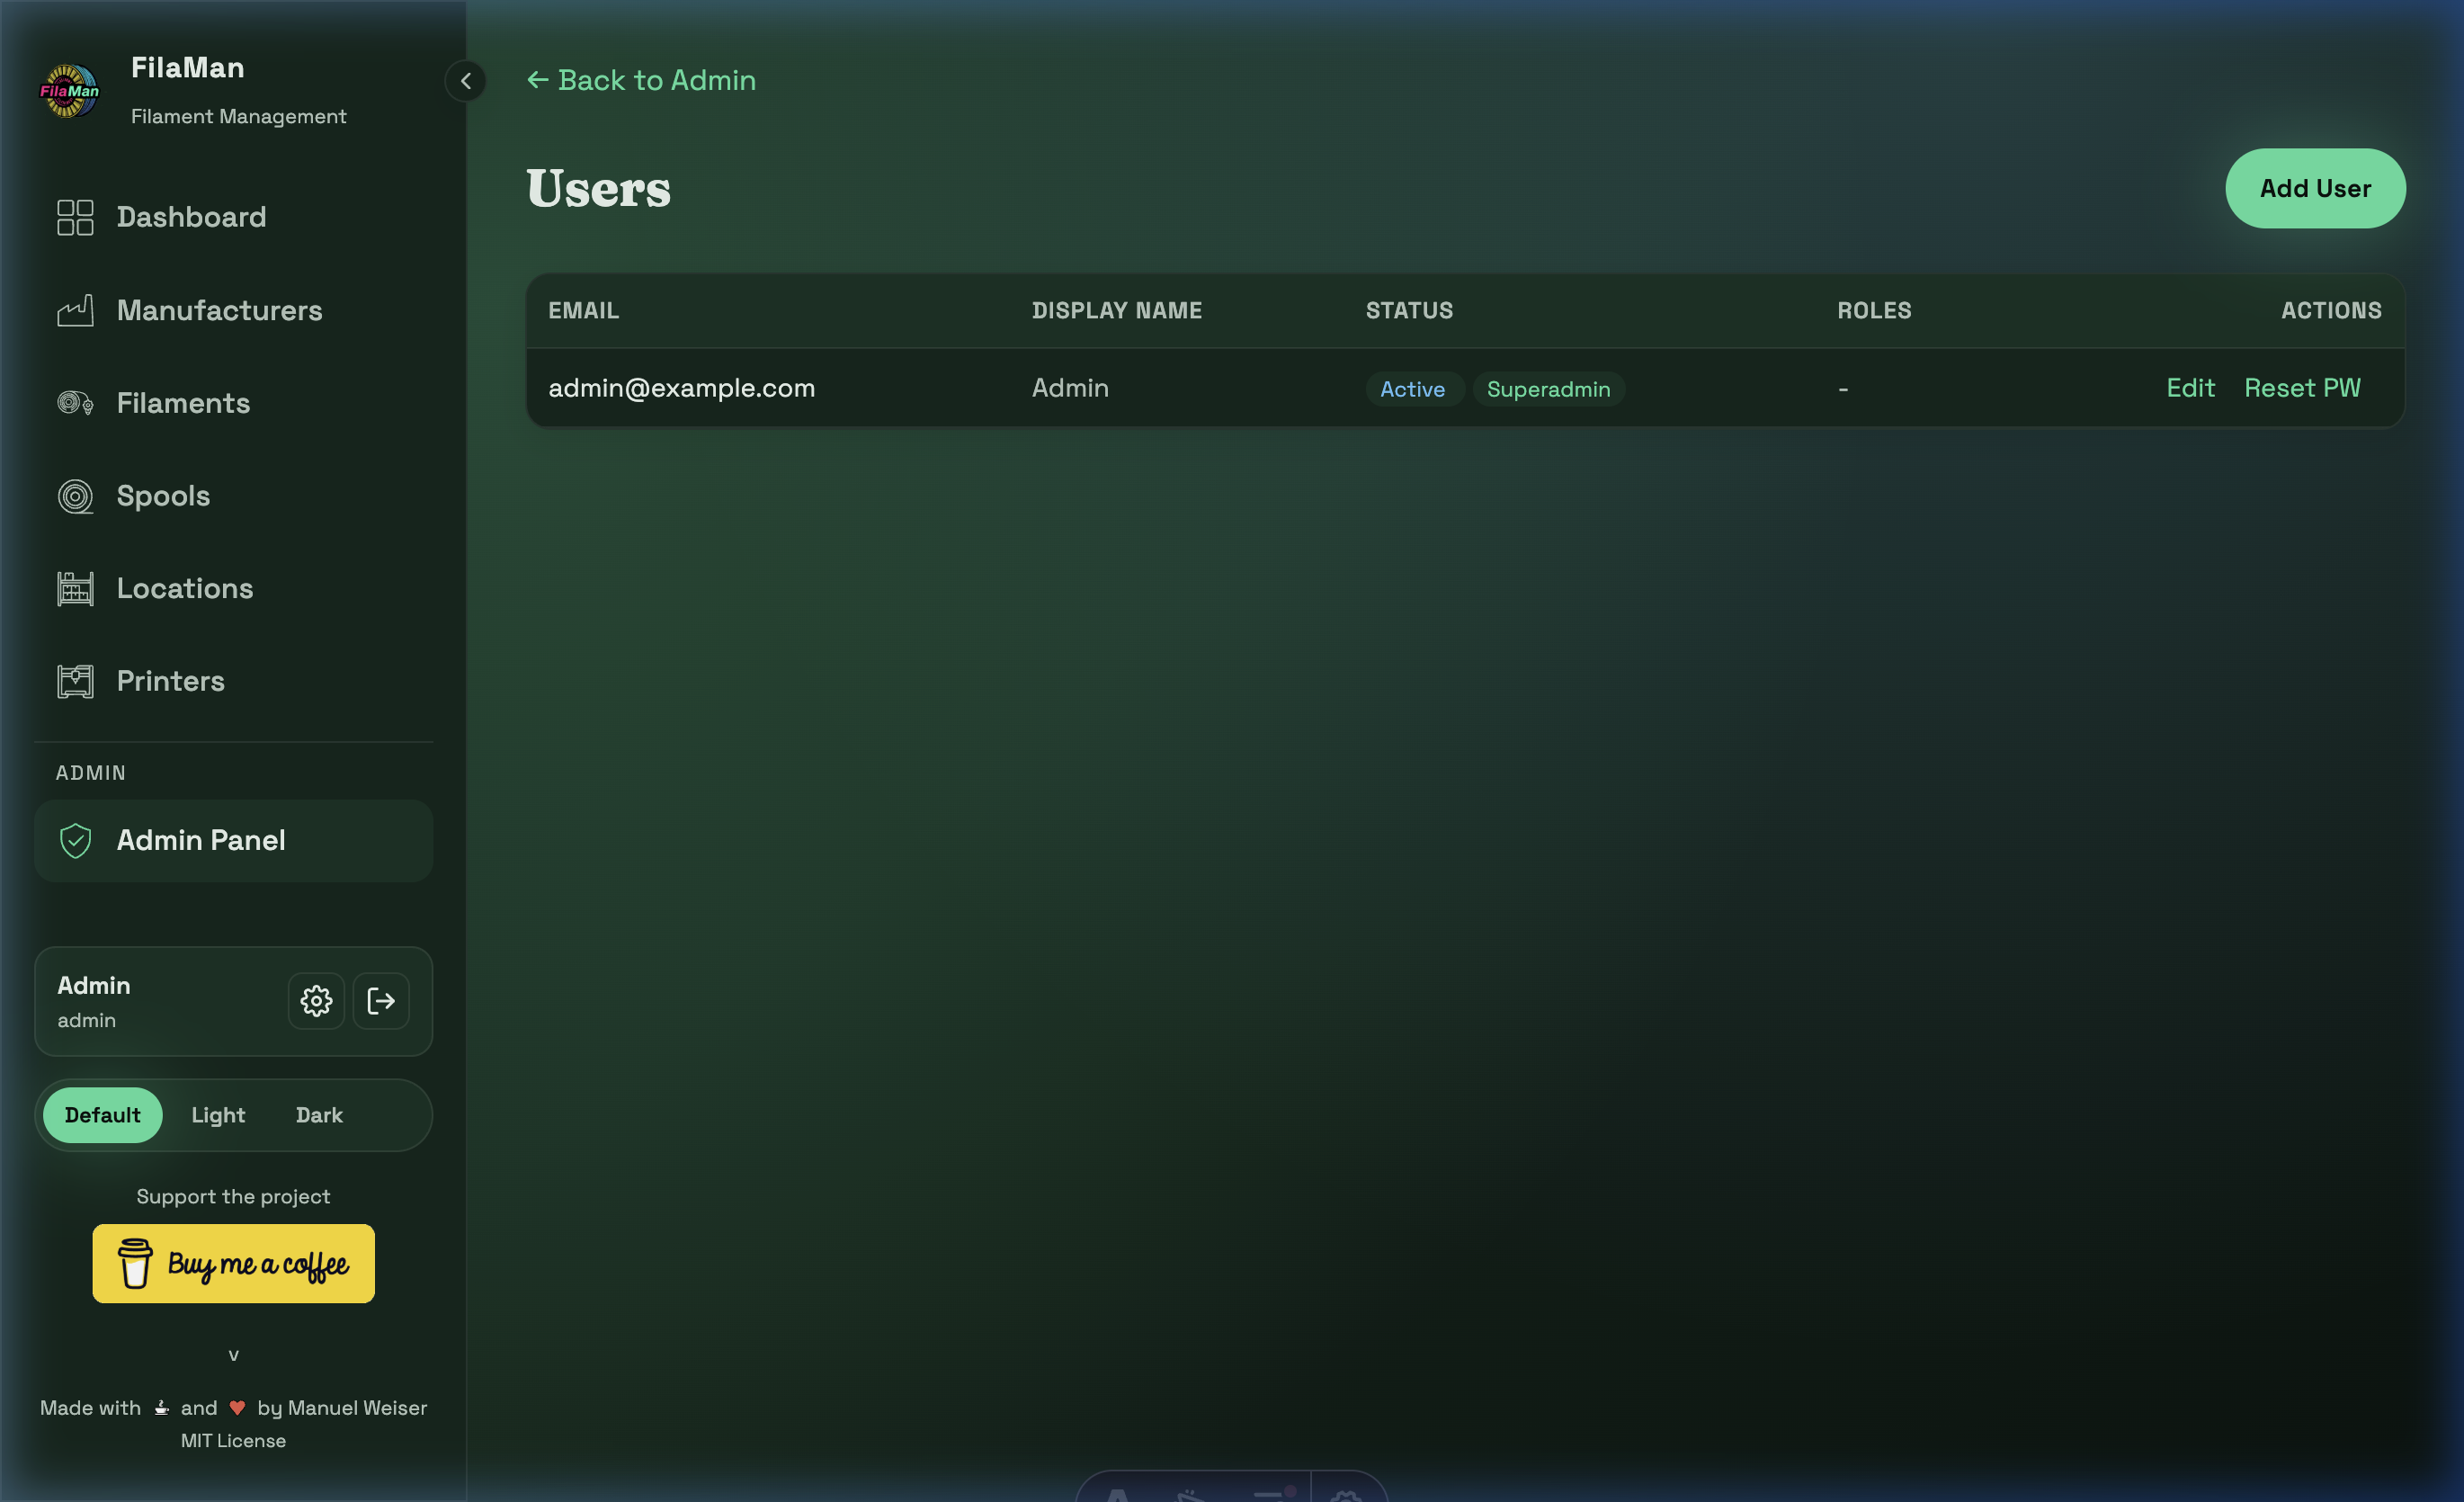
Administrators can manage all users in the system here. The table shows:
| Column | Description |
|---|---|
| User's email address (used for login) | |
| DISPLAY NAME | Display name within the application |
| STATUS | Active / Inactive |
| ROLES | Assigned roles (e.g. Superadmin, User) |
| ACTIONS | Edit / Reset PW |
Available actions:
- Add User (top right) – Create a new user with email, password, and role
- Edit – Change a user's email, name, or role
- Reset PW – Reset a user's password
11.2 Roles & Permissions
URL: http(s)://url/admin/roles
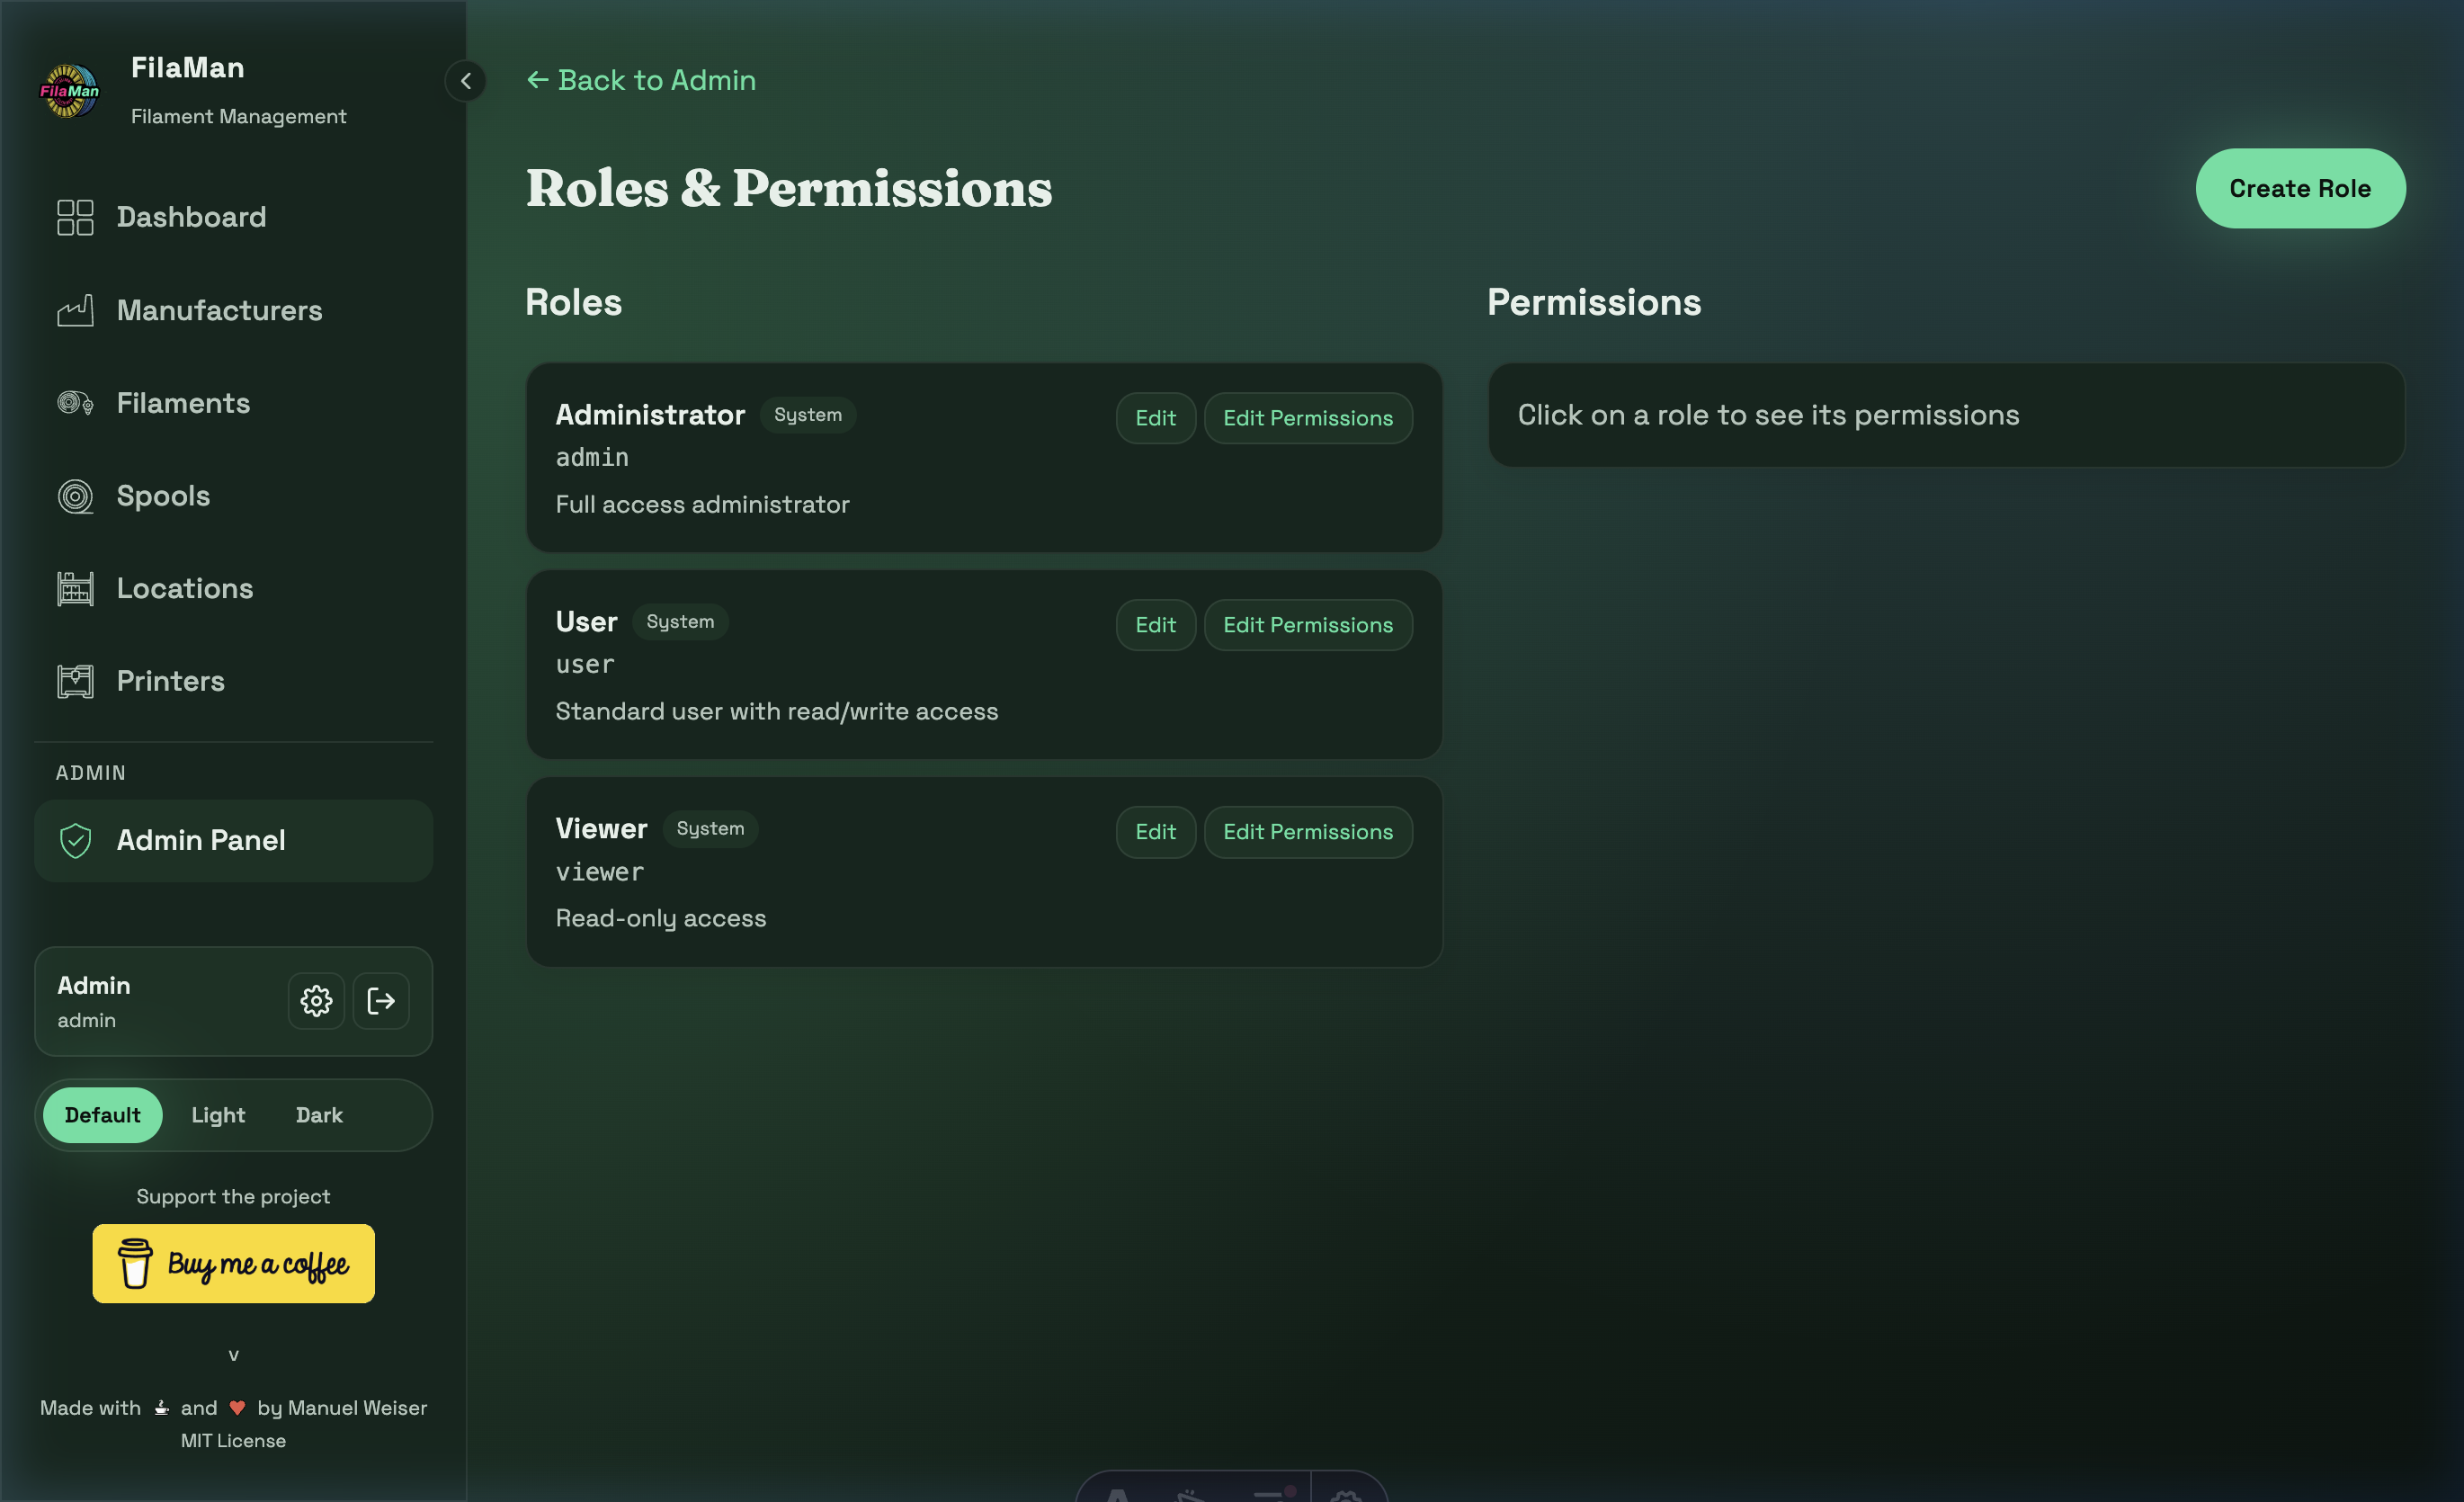
FilaMan ships with three built-in system roles that cannot be deleted:
| Role | Key | Description |
|---|---|---|
| Administrator | admin |
Full access to all features and the admin area |
| User | user |
Standard user with read and write access |
| Viewer | viewer |
Read-only access |
Click "Create Role" (top right) to create custom roles with specific permissions. Use "Edit Permissions" to fine-tune what each role is allowed to do.
Click on a role to view and edit its assigned permissions in the Permissions panel on the right.
11.3 Devices
URL: http(s)://url/admin/devices
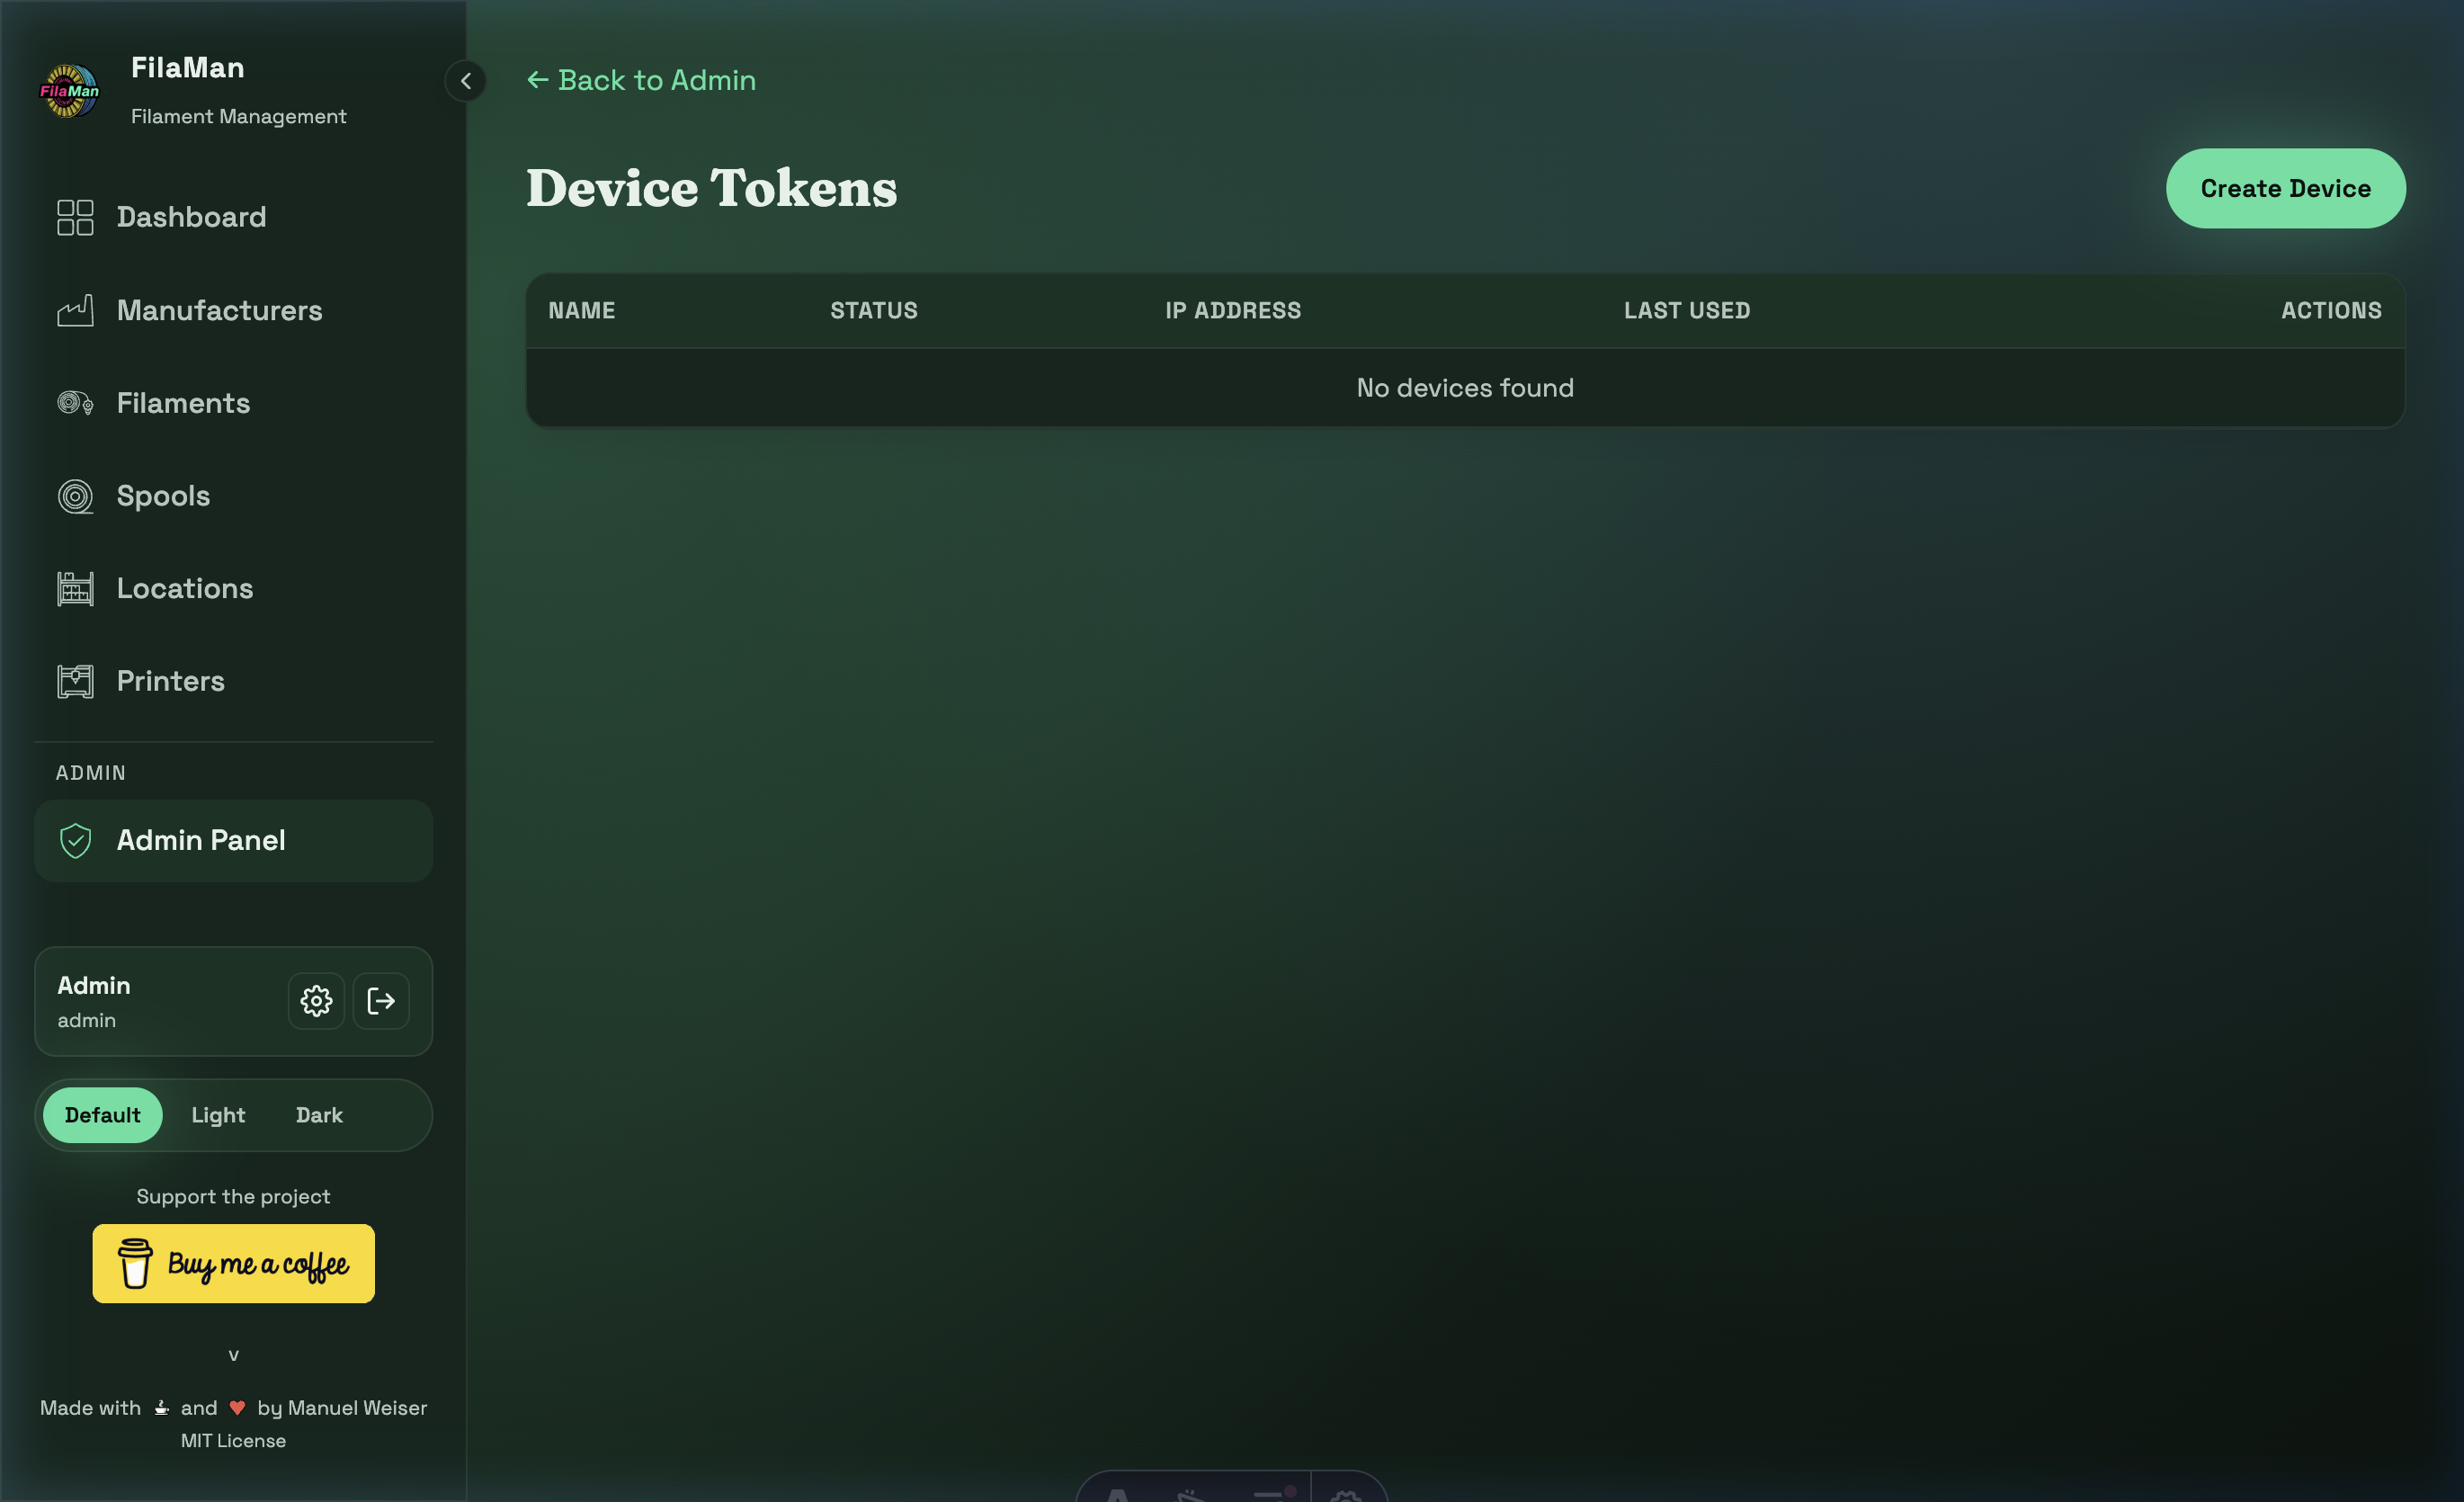
This section manages external devices that communicate with the FilaMan API (e.g. ESP32 scales with RFID scanners). Each device receives its own API token for authentication.
Device Actions
- Add device – Create a new device with a name and optional device code
- Create token – Generate a new API token for a device
- Revoke token – Disable access for a device
- Edit – Change device name and settings
Auto-Assign Configuration
For each device, the following settings for automatic spool assignment can be configured:
| Setting | Description |
|---|---|
| Auto-Assign enabled | When enabled, weighing a spool on this device will automatically send a pending assignment to all connected printers. As soon as the spool is inserted into an AMS slot, the filament settings are automatically transmitted. |
| Auto-Assign Timeout | Time in seconds after which a pending assignment is automatically discarded (default: 60 seconds). If no spool is inserted within this time, the assignment expires. |
Note: Auto-Assign is configured per device, not per printer. When Auto-Assign is enabled for a device, ALL connected printers are notified. The assignment then happens automatically on whichever printer the spool is actually inserted into.
For more details on the workflow: → Printers: Automatic Spool Assignment
11.4 Extra Fields
URL: http(s)://url/admin/extra-fields
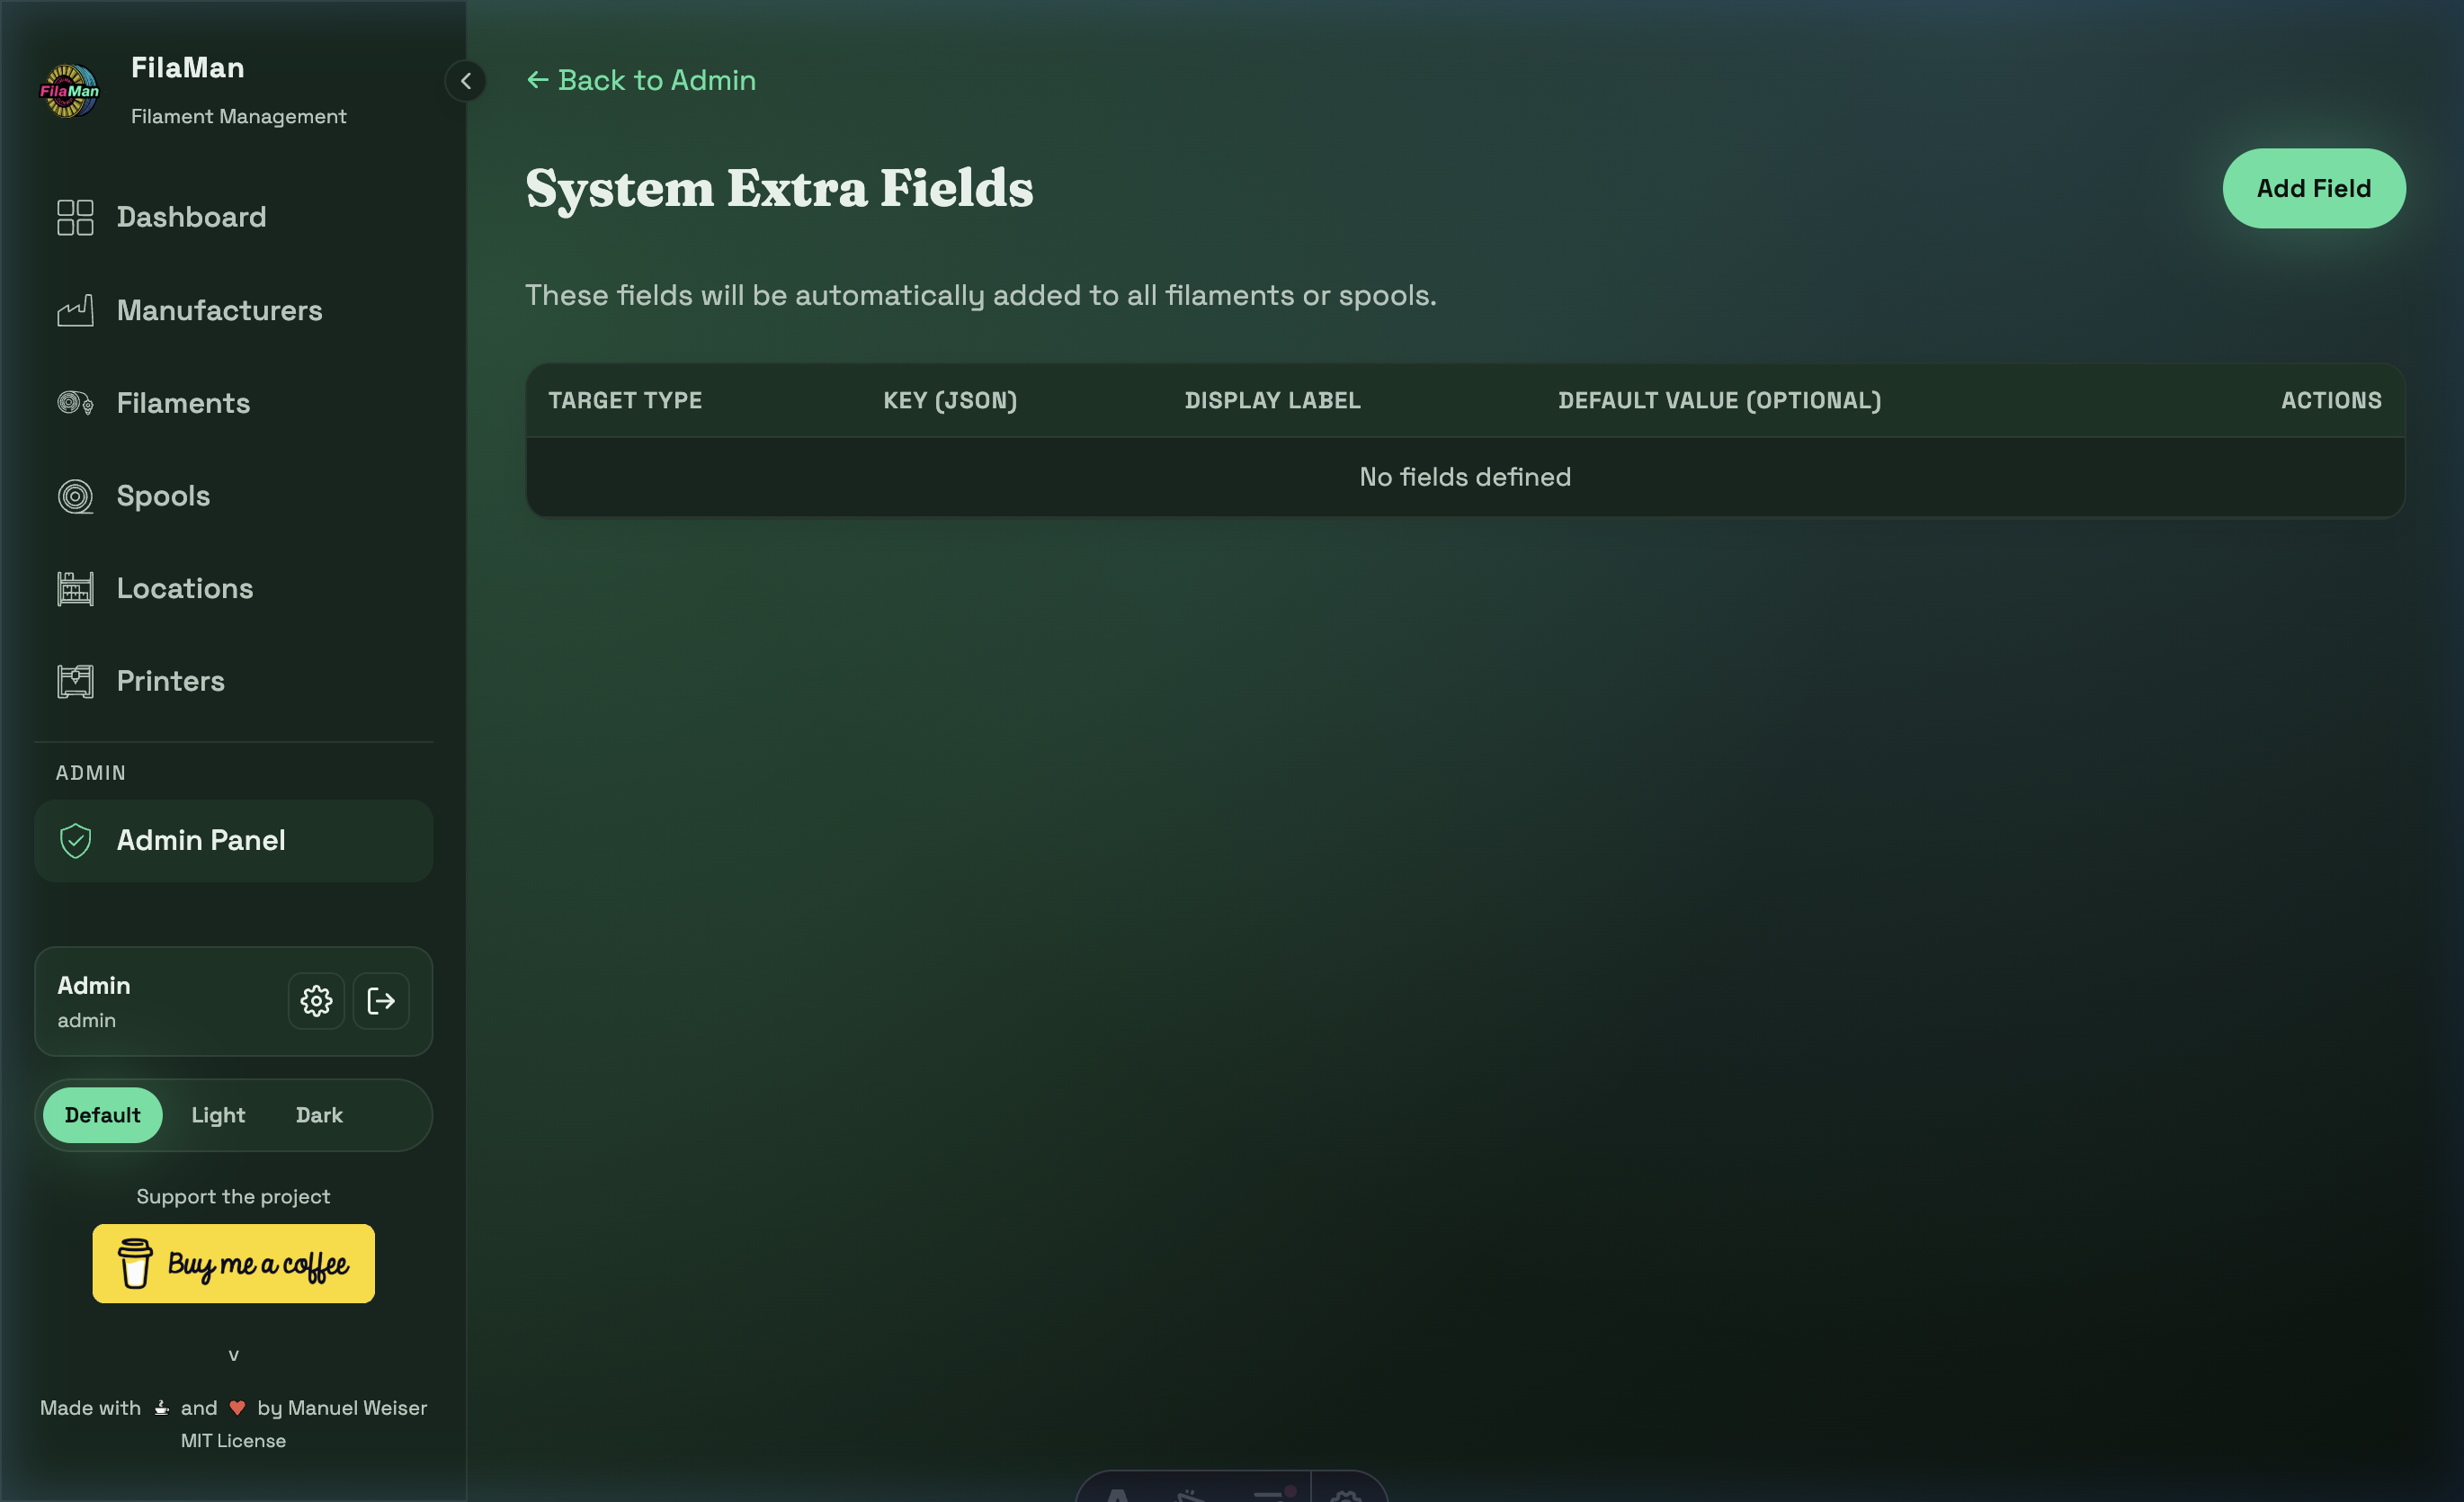
System Extra Fields allow administrators to define additional data fields for spools and filaments beyond the standard fields. These fields are automatically added to all filaments or spools.
| Column | Description |
|---|---|
| TARGET TYPE | Whether the field applies to filaments or spools |
| KEY (JSON) | Internal JSON key for the field |
| DISPLAY LABEL | Label shown in the user interface |
| DEFAULT VALUE (OPTIONAL) | Optional default value |
Click "Add Field" (top right) to create a new extra field.
Examples for extra fields:
- "Drying time" for spools
- "Print temperature" for filaments
- "Supplier" as an additional manufacturer field
Once extra fields are created, they appear as additional input fields in the corresponding forms (Add Spool, Add Filament).
11.5 System (Plugin Management)
URL: http(s)://url/admin/system
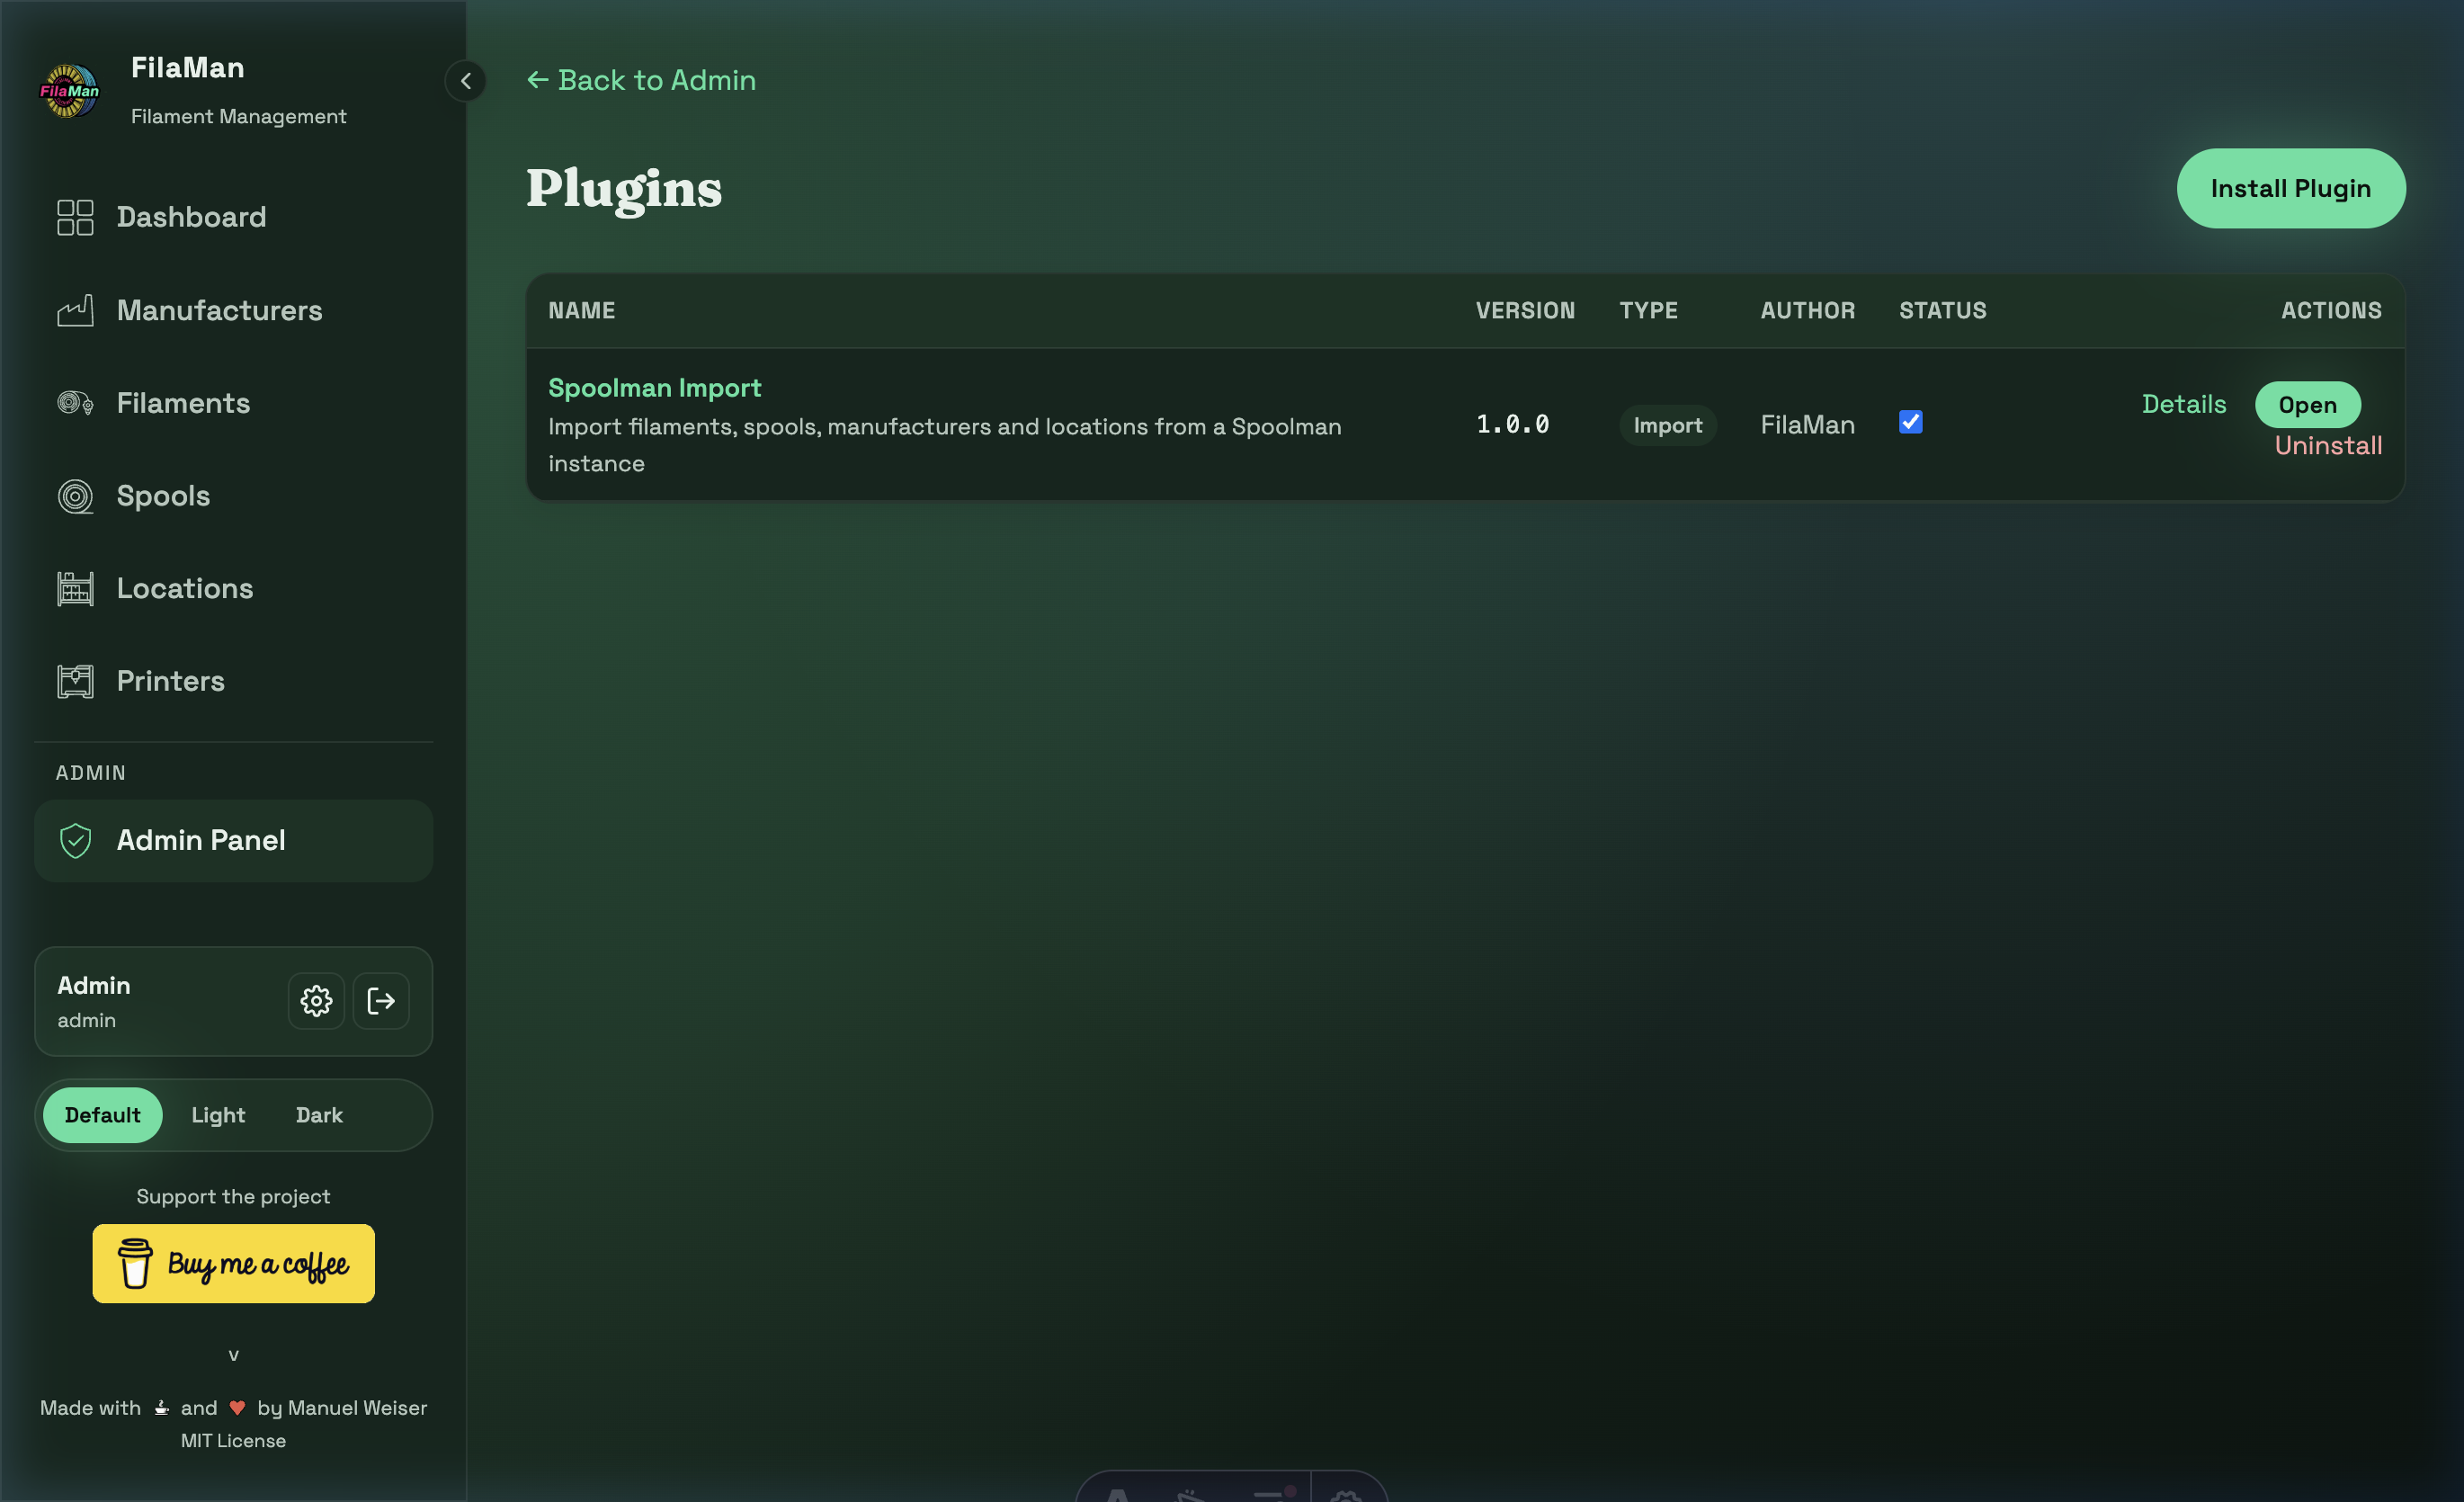
The System section is the central place for plugin management. All installed plugins are displayed and managed here.
Plugin Overview
The plugin table shows all installed plugins with the following columns:
| Column | Description | |--------|-------------| | NAME | Plugin name and short description | | VERSION | Installed version (e.g. 2.1.10) | | TYPE | Plugin type: Driver (printer driver), Import (data import), or Integration (third-party connection) | | AUTHOR | Plugin author | | STATUS | Enabled/Disabled — toggleable via switch | || ACTIONS | Details / Update (if available) / Open / Uninstall |
Installing a Plugin
Click "Install Plugin" in the top right. A dialog opens with two installation options:
Option 1: Install from Plugin Registry (recommended)
- The "Install from Registry" dropdown shows all available plugins
- The list is automatically loaded from the official plugin repository (Fire-Devils/filaman-plugins) on GitHub
- Select the desired plugin from the dropdown — name, version, and description are displayed
- Click "Install Plugin" to start the installation
- FilaMan automatically downloads, validates, and installs the plugin
Option 2: Upload ZIP file manually
- Below the registry dropdown, you'll find the "Plugin ZIP File" section
- Drag and drop a
.zipfile into the marked area — or click to select a file - The file is automatically validated (structure, manifest, security)
- On successful validation, a confirmation with plugin details appears
- Click "Install Plugin" to complete the installation
Note: Manual ZIP uploads are intended for developers or for plugins that are not yet available in the official registry.
Checking for Updates
Click "Check for Updates" in the top right, next to the Install button.
- FilaMan compares installed plugin versions with the latest versions in the registry
- If updates are available, a notification shows the number of available updates
- Each plugin with an available update gets an "Update to v…" button directly in the plugin table
- Click this button to update the respective plugin to the latest version — no need to go through "Install Plugin" anymore
Enabling / Disabling a Plugin
Each plugin can be enabled or disabled via the toggle switch in the Status column:
- Enabled — The plugin is active and its features are available (e.g. printer drivers are loaded)
- Disabled — The plugin remains installed but is inactive. Already connected printers will be disconnected
Uninstalling a Plugin
- Click "Uninstall" in the Actions column of the plugin
- Confirm the uninstallation in the confirmation dialog
- An additional prompt asks whether to also delete the plugin data (e.g. extra fields, printer parameters):
- Yes — Removes the plugin and all associated data (extra fields, saved parameters)
- No — Removes only the plugin; data is preserved (useful when reinstalling)
Plugin Details
Click "Details" to view detailed information about a plugin:
- Plugin name, version, and description
- Plugin type (Driver / Import / Integration)
- Author and homepage
- Supported capabilities (e.g. AMS support, RFID, Auto-Match)
- List of printer parameters created by the plugin
11.6 Database Backup & Restore
URL: http(s)://url/admin/backup
⚠️ Note: All backup and restore functions are only available to superadmins.
The Backup section provides comprehensive tools to back up and restore the FilaMan database. Two backup modes are available: Full Backup (all data) and Inventory Backup (inventory data only).
Export Full Backup
Exports all data from the database as a JSON file, including:
- Users, passwords, API keys, and sessions
- Roles and permissions
- Devices and plugins
- All inventory data (manufacturers, filaments, spools, printers, colors, locations, etc.)
Click "Export Backup" to download the file. The filename automatically includes a timestamp (e.g. filaman_backup_20260313_120000.json).
⚠️ Security warning: The exported file contains sensitive data (password hashes, API keys). Store this file securely and do not share it with others!
Import Full Backup
Restores a previously exported full backup.
- Select a
.jsonbackup file using the file upload - Click "Import Backup"
- Confirm the operation in the confirmation dialog
- A progress bar shows the import status
- After a successful import, the page reloads automatically
🚨 Warning: Importing will DELETE ALL existing data and replace it with the backup data! An automatic safety backup of the current data is created before the import.
Export Inventory
Exports only inventory data as a JSON file:
- Manufacturers, colors, locations
- Filaments and spools
- Printers and printer slots
- Ratings, events, and extra fields
Not included: Users, passwords, API keys, sessions, roles, permissions, devices, plugins, and OIDC settings.
Click "Export Inventory" to download the file (e.g. filaman_inventory_20260313_120000.json).
✅ Safe to share: The inventory export contains no sensitive authentication data and can be safely exchanged between FilaMan instances.
Import Inventory
Imports inventory data from another FilaMan instance. Users, roles, devices, and plugins remain unchanged.
- Select a
.jsoninventory file using the file upload - Click "Import Inventory"
- Confirm the operation in the confirmation dialog
- The import progress is shown with a progress bar
⚠️ Warning: Importing will delete existing inventory data and replace it with the imported data! Users and settings are preserved. An automatic safety backup is created before the import.
SQLite Backups
Note: This section is only visible when FilaMan is running with a SQLite database. For MySQL or PostgreSQL, backups must be managed externally by the administrator.
FilaMan automatically creates SQLite database backups (daily and before updates). These are stored in the backup directory (default: /app/data/backups).
The table shows all available backups with the following information:
| Column | Description |
|---|---|
| File | Backup filename |
| Date | Creation date |
| Size | File size |
Two actions are available for each backup:
- Restore — Restores the database from this backup. An automatic backup of the current database is created before the restore. After restoring, the application must be reloaded.
- Delete — Permanently deletes the selected backup file.
11.7 OIDC / SSO
URL: http(s)://url/admin/oidc
⚠️ Note: The OIDC card on the Admin Panel is only clickable when accessing FilaMan via HTTPS. On HTTP connections, the card displays a notice that OIDC requires HTTPS and is not clickable.
This section allows administrators to configure OpenID Connect (OIDC) for Single Sign-On (SSO). Users can then log in using an external identity provider (e.g. Authentik, Keycloak, Azure AD).
Configuration Fields
| Setting | Description |
|---|---|
| Enabled | Toggle to enable or disable OIDC login |
| Issuer URL | The OIDC provider's issuer URL (must be https://) |
| Client ID | The client ID registered with your OIDC provider |
| Client Secret | The client secret (stored encrypted in the database) |
| Scopes | OIDC scopes to request (default: openid email profile) |
| Button Text | Custom label for the SSO button on the login page (e.g. "Login with Authentik") |
Requirements
- HTTPS required — OIDC only works when FilaMan is accessed via HTTPS
OIDC_ENC_KEYenvironment variable — Must be set for encrypting the client secret. Generate with:openssl rand -hex 32
- Existing users only — Only users who already exist in FilaMan can log in via OIDC. The provider's email address must match an existing user account. The email must be verified by the provider.
- No auto-creation — OIDC login does not create new user accounts
11.8 App Settings
URL: http(s)://url/admin/app-settings
System-wide settings that control FilaMan's behavior are managed here.
RFID Extended Data {#rfid-extended-data}
This section configures whether and in what format additional filament data is written to NFC tags when a FilaMan scale (ESP32) writes a tag.
| Setting | Description |
|---|---|
| RFID Extended Data enabled | When active, writing a spool tag via the scale will also embed filament data (material, color, brand, temperatures) in the chosen protocol format. |
| RFID Protocol | Choice of data format: OpenSpool (compatible with the OpenSpool standard) or FilaMan (proprietary FilaMan format). Both formats are readable by the FilaMan scale. |
Fields written to the tag (when enabled):
{
  "protocol": "openspool",
  "version": "1.0",
  "type": "PLA",
  "color_hex": "FF3300",
  "brand": "Bambu Lab",
  "min_temp": "180",
  "max_temp": "230"
}
These fields are written alongside the spool ID in the root object of the tag payload.
💡 Note: Tags written in OpenSpool or FilaMan format can be read back using the Import from Tag feature when creating new spools. The scale detects the protocol and automatically transfers brand, material, and color into the form.
⚠️ Tag capacity note: NTAG213 tags (144 bytes user data) may not have enough space for the additional fields if the spool ID already takes up significant space. For Extended Data, NTAG215 (504 bytes) or NTAG216 (888 bytes) are recommended.
11.9 Danger Zone
At the bottom of the Admin Panel you will find the red-highlighted Danger Zone with one critical action:
⛔ "Delete all data"
Permanently deletes all spools, filaments, manufacturers, colors, locations, and printers, including all logs and events.
User accounts, roles, permissions, and devices are not affected.
This action cannot be undone!